Tile roofs can last 50 years or more, but weather, age, and impacts take their toll. Cracked or broken tiles don’t just look bad, they expose underlayment to moisture, leading to leaks, rot, and expensive structural damage. Most tile repairs are manageable DIY projects if you’re comfortable working on a sloped roof with basic tools. That said, some repairs, especially those involving underlayment or flashing around chimneys and valleys, may require a licensed roofer, particularly if local building codes mandate permits for roofing work. This guide walks through identifying damage, gathering the right materials, and making repairs that’ll keep your roof watertight for years to come.
Table of Contents
ToggleKey Takeaways
- Tile roof repair requires addressing three critical areas—damaged tiles, compromised underlayment, and failed flashing—to prevent costly water damage and structural deterioration.
- Cracked or broken tiles expose your roof’s underlayment to moisture; catch these issues early by inspecting gaps, slipped tiles, and ceiling stains from the interior.
- Essential safety equipment including OSHA-compliant harnesses, non-slip boots, and proper ladder support is non-negotiable when performing tile roof repairs on steep pitches.
- Underlayment typically lasts 20–30 years and should be patched for small tears but replaced entirely if brittle or showing rot; felt installed before 2000 may contain asbestos.
- Most tile roof leaks originate from failed flashing around valleys, chimneys, and vent pipes rather than the tiles themselves, requiring careful caulking and metal replacement.
- Hire a licensed, insured roofer for underlayment, flashing, and multi-tile repairs that exceed local permit thresholds, as professional expertise prevents costly mistakes and ensures code compliance.
Common Types of Tile Roof Damage
Tile roofs fail in predictable patterns. Knowing what you’re looking for helps you catch problems early.
Cracked or broken tiles are the most visible issue. Heavy branches, hail, or someone walking carelessly on the roof can snap tiles outright. Hairline cracks may seem minor, but they let water seep underneath, saturating the underlayment.
Slipped or displaced tiles happen when fasteners corrode or when high winds lift edges. You’ll notice gaps in the tile pattern or tiles sitting lower than their neighbors. These gaps funnel water straight to the deck.
Deteriorated underlayment isn’t visible from the ground, but if tiles near valleys or eaves look stained or if you spot interior ceiling stains, the felt or synthetic underlayment beneath may be compromised. Underlayment typically lasts 20–30 years, less in hot climates.
Failed flashing around chimneys, vent pipes, and roof-to-wall transitions causes most tile roof leaks. Flashing is sheet metal (often aluminum or galvanized steel) that diverts water. When caulk dries out or metal corrodes, water sneaks behind tiles.
Efflorescence and moss growth signal trapped moisture. White chalky deposits (efflorescence) appear when salts leach out of concrete or clay. Moss indicates chronic dampness, often from poor drainage or shaded areas.
Essential Tools and Materials for Tile Roof Repair
Tile repair doesn’t require a fully stocked contractor’s truck, but you’ll need specific gear to do it safely and correctly.
Safety equipment (non-negotiable):
- OSHA-compliant roof harness and anchor point for pitches above 6:12
- Non-slip work boots with soft soles (hard soles can crack tiles)
- Safety glasses and work gloves
- Sturdy extension ladder rated for your weight plus 50 lbs
Tools:
- Flat pry bar or slate ripper for lifting tiles without breaking adjacent ones
- Trowel for applying roofing cement
- Caulking gun loaded with polyurethane or butyl sealant
- Angle grinder with masonry blade (if you need to trim tiles to fit)
- Hammer and galvanized roofing nails (1¼” for most applications)
- Wire brush for cleaning old mortar or debris
Materials:
- Replacement tiles matching your roof’s profile (S-tile, flat shake, barrel, or interlocking). Buy a few extras, tiles break easily during transport.
- #30 felt or synthetic underlayment (if you’re patching underlayment)
- Roofing cement or mastic (not tar, tar degrades in UV)
- Metal flashing (step flashing, valley flashing, or vent boot as needed)
- Butyl or polyurethane caulk rated for exterior roofing
Tile profile matters. Concrete tiles and clay tiles have different weights and fastening requirements. Bring a sample tile to your supplier to ensure an exact match in color, shape, and thickness. Slight mismatches in profile cause poor water shedding and stress adjacent tiles.
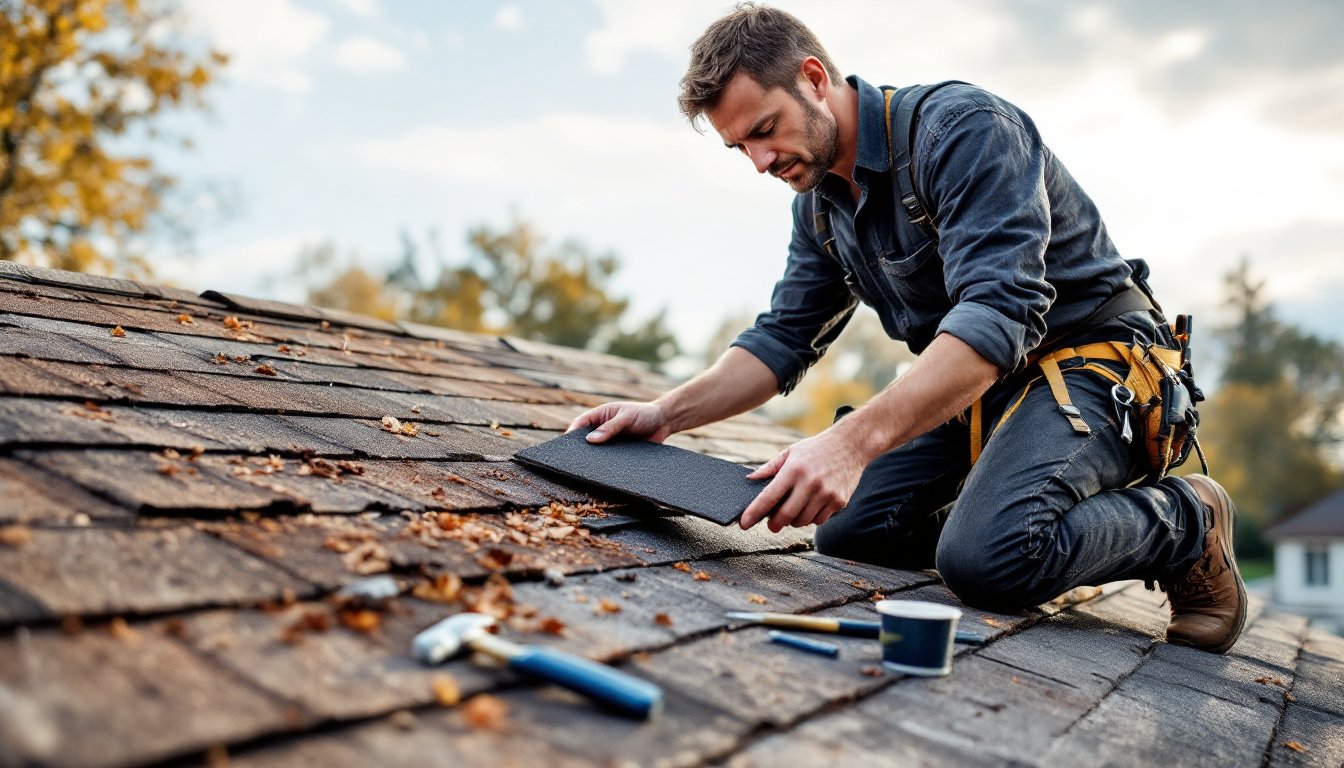
Step-by-Step Guide to Replacing Broken or Cracked Tiles
Replacing a damaged tile is straightforward, but rushing the job or skipping prep leads to more broken tiles and leaks.
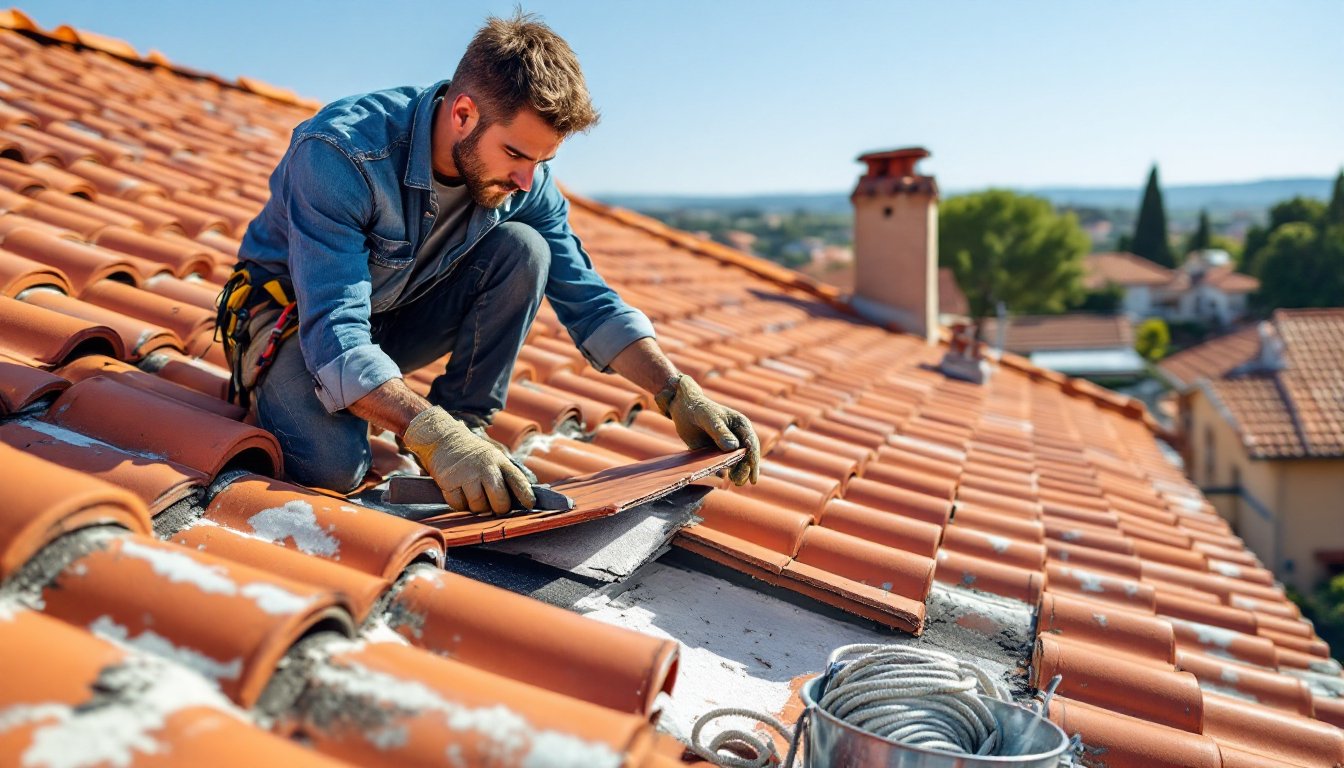
Safely Removing Damaged Tiles
- Work on a dry roof only. Wet tiles are slick, and morning dew is enough to make clay and concrete treacherous.
- Step on tile overlaps, not centers. Place your weight where two tiles meet, which distributes load onto the battens or deck below.
- Lift surrounding tiles carefully. Use a flat pry bar to gently raise the tiles immediately above and to the sides of the damaged one. Tile roofs interlock, you’ll need to free the broken tile without cracking neighbors.
- Break out the damaged tile if necessary. If it won’t slide free, tap it gently with a hammer to break it into smaller pieces. Wear safety glasses, tile shards are sharp and can ricochet.
- Remove old nails or fasteners. Most tiles are nailed or clipped to battens. Use the pry bar or a slate ripper (a long flat tool that slides under tiles to cut nails). Pull any remaining nail shanks.
- Inspect the underlayment. Once the tile is out, check the felt or synthetic underlayment for tears, stains, or brittleness. Small tears (under 2 inches) can be patched with roofing cement. Larger damage requires underlayment replacement (see next section).
Installing and Securing New Tiles
- Dry-fit the replacement tile. Slide it into position without fasteners to confirm it sits flush with adjacent tiles. Trim with an angle grinder if needed, though properly matched tiles shouldn’t require cutting.
- Apply roofing cement to the underside edges (not the entire bottom, tiles need airflow). A thin bead along the edges prevents wind-driven rain from wicking underneath.
- Secure with galvanized nails or clips. Drive one or two 1¼” galvanized roofing nails through pre-drilled holes (most tiles have them) into the batten or deck. Don’t overdrive, cracking the tile defeats the purpose. Some modern systems use metal clips instead of nails: follow the original fastening method.
- Overlap correctly. Tiles must overlap by at least 3 inches (more in high-wind zones). The replacement tile should tuck under the tile above and overlap the tile below, just like the originals.
- Seal edges with caulk if exposed. For tiles along rakes (roof edges) or near flashing, run a bead of polyurethane caulk where the tile meets metal. This prevents water intrusion and wind uplift.
- Lower surrounding tiles back into place. Gently press the tiles you lifted earlier back down, ensuring they interlock properly.
Many roof repairs require similar methodical approaches to prevent water intrusion, whether you’re working with tile, asphalt, or metal.
Repairing Underlayment and Flashing Issues
Tile repairs are cosmetic if the underlayment and flashing beneath are failing. These components are your roof’s true waterproofing layer.
When to patch vs. replace underlayment:
- Patch: Small punctures or tears under 6 inches in low-traffic areas. Cut a piece of matching underlayment (usually #30 felt or synthetic) 6 inches larger than the damage. Coat the area with roofing cement, press the patch down, then seal edges with more cement.
- Replace: If underlayment is brittle, torn in multiple spots, or shows black staining (rot), you’ll need to remove several tiles to access a larger area. This often means removing a 3×3-foot section or more. Felt underlayment installed before 2000 may contain asbestos, test before disturbing, especially in older homes. If you’re replacing more than 10 square feet, check local codes: some jurisdictions require permits and inspections for roofing work exceeding a threshold.
Flashing repairs:
Most tile roof leaks trace back to failed flashing, not tiles. Common trouble spots include:
- Valleys: Where two roof planes meet, water volume is highest. Valley flashing (often W-shaped metal) must extend at least 8 inches up each slope. If caulk has dried or metal has pinholes, remove tiles along the valley edge, clean old sealant, apply fresh butyl caulk, and re-lay tiles with roofing cement sealing the tile-to-metal joint.
- Chimneys and skylights: Step flashing (L-shaped metal pieces) should interleave with each course of tiles. If you see rust or gaps, you’ll need to remove tiles around the penetration, install new step flashing (overlapping each piece by 3 inches), and caulk where metal meets masonry or glass. Professional contractors often recommend this work if the chimney requires re-pointing or if flashing must be custom-bent.
- Vent pipes: Rubber or metal vent boots crack after 15–20 years. Replacement is simple: remove surrounding tiles, pry up the old boot, slide a new one over the pipe, nail the flange to the deck, apply roofing cement around the base, and re-tile. Choose an all-metal boot in hot climates, rubber degrades faster.
Cost considerations:
Underlayment and flashing repairs add up quickly. Expect to spend $200–$500 in materials for a modest DIY flashing project. Roof repair costs vary widely by region and material, with tile projects often more expensive than asphalt due to labor intensity. If you’re hiring out, get three quotes and verify the contractor is licensed and insured, roofing work has high liability.
Conclusion
Tile roofs reward attention. Catching a cracked tile or worn flashing early can prevent thousands in water damage down the line. Most tile replacements are within reach for a confident DIYer with the right tools and a healthy respect for roof safety. For underlayment and flashing repairs, especially around chimneys or if you’re dealing with multiple damaged areas, consider bringing in a licensed roofer. Even experienced renovators often subcontract roofing work when liability and code compliance are on the line.