A leaking roof doesn’t announce itself politely. Most homeowners discover damage after a water stain blooms across the ceiling or drips land in a strategically placed bucket. Whether it’s missing shingles from a windstorm, flashing failure around the chimney, or wear from decades of sun exposure, roof damage demands attention. Left unaddressed, a small leak becomes rot, mold, and a five-figure repair bill. This guide walks through identifying roof damage, deciding when you can handle repairs yourself, and executing fixes that actually hold up through the next storm season.
Table of Contents
ToggleKey Takeaways
- Identify roof damage early through ground inspection with binoculars, attic checks for light penetration, and moisture detection to prevent small leaks from becoming expensive rot and mold problems.
- DIY roof repair is safe only for minor fixes like replacing fewer than 10-15 shingles or resealing small flashing gaps; structural damage, steep pitches over 6:12, or damage covering over 20% of a roof plane requires professional contractors.
- Proper damaged roof repair timing requires temperatures between 50°F and 85°F, correct nailing techniques below the adhesive strip with four nails per shingle, and roofing cement sealing of tabs for wind resistance.
- Invest in quality safety equipment including fall protection harnesses, soft-soled shoes, and roof ladders rather than cutting corners, as roofing work causes more DIY injuries than any other home project.
- Prevent future roof damage through twice-yearly seasonal inspections that clear debris, trim branches within six feet of rooflines, and maintain proper attic ventilation to extend roof lifespan by 5-10 years.
- Document all roof damage with photos and monitor repairs through at least two rain events; water stains may take weeks to dry, but new moisture indicates the seal failed and professional help is needed.
How to Identify Different Types of Roof Damage
Roof damage isn’t always obvious from the ground. Start with a pair of binoculars and a walk around the property perimeter. Look for missing or curled shingles, dark streaks indicating algae growth, and granule loss (check gutters for black sand-like material, that’s the protective coating washing off).
From the attic, inspect on a sunny day. Light bleeding through pinholes signals roof deck penetration. Run your hand along rafters and sheathing, moisture or soft spots mean water’s been infiltrating. Staining patterns help trace the leak source: water travels along joists and rafters before dripping, so the wet spot inside rarely sits directly under the exterior breach.
Common damage types include:
- Shingle deterioration: cracking, blistering, or loss of granules from UV exposure and thermal cycling
- Flashing failure: gaps or corrosion around chimneys, vents, skylights, and valleys where two roof planes meet
- Storm damage: wind lifts shingle edges: hail creates divots that compromise the asphalt layer
- Structural issues: sagging rooflines or visible dips suggest rafter failure or sheathing rot, both require immediate professional assessment
- Ice dam damage: occurs in cold climates when melting snow refreezes at eaves, forcing water under shingles
Document everything with photos, including close-ups of damaged areas and wide shots showing roof context. Insurance claims and contractor estimates both need visual evidence.
Assessing the Severity: When to DIY vs. Call a Professional
Not all roof repairs belong in the DIY column. Structural roof repair, anything involving sagging rooflines, compromised rafters, or widespread sheathing replacement, requires a licensed contractor and often an engineer’s stamp. Most jurisdictions require permits for structural work, and homeowner’s insurance won’t cover amateur fixes that fail.
Safe DIY territory includes:
- Replacing fewer than 10-15 individual shingles in an accessible area
- Resealing exposed nail heads or small flashing gaps with roofing cement
- Cleaning debris from valleys and applying limited patches
- Minor gutter and downspout adjustments related to water diversion
Call a professional when:
- The roof pitch exceeds 6:12 (6 inches of rise per 12 inches of run), fall risk spikes dramatically
- Damage covers more than 20% of a single roof plane
- The leak source isn’t obvious after inspection
- Flashing around chimneys or skylights needs replacement (improper sealing guarantees future leaks)
- The roof is over 20 years old: isolated repairs on an aging system often just delay inevitable replacement
- You’re uncomfortable with heights or lack fall protection equipment
Roofing work kills and injures more DIYers than any other home project. If you’re second-guessing your ability to work safely on a slope, that’s your gut telling you to hire out. Contractor costs for minor repairs typically run $300-$800 depending on region and access difficulty, cheaper than an ER visit.
One exception: if insurance is covering repairs, most policies require licensed contractors. Check your policy before climbing up.
Essential Tools and Materials for Roof Repair
Roof repair demands the right gear. Cutting corners on safety equipment isn’t thrift, it’s reckless.
Safety equipment (non-negotiable):
- Fall protection harness with roof anchor points rated for your weight plus 30%
- Soft-soled shoes with good grip (roofing boots or clean sneakers, never hard-soled work boots)
- Safety glasses and work gloves
- Roof ladder with standoff brackets to avoid gutter damage
Tools:
- Flat pry bar for lifting shingle tabs without tearing
- Roofing hammer or nail gun (pneumatic speeds work but requires compressor)
- Utility knife with hooked blades for cutting shingles
- Caulk gun for roofing cement application
- Chalk line for alignment on larger patches
- Wire brush for cleaning old adhesive or debris
Materials:
- Replacement shingles matching your existing roof (bring a sample to the supply yard, color names vary by manufacturer)
- Roofing nails: 1¼-inch galvanized or aluminum: count on 4 nails per shingle
- Roofing cement or lap sealant (not general-purpose caulk, it won’t flex with thermal movement)
- Ice and water shield (self-adhesive underlayment) for valley or flashing repairs
- Drip edge or step flashing if repairing edge or sidewall transitions
Most repairs require less than one bundle of shingles (covers roughly 33 square feet). Buy an extra bundle, colors fade over time, and finding an exact match three years later is nearly impossible. Cost estimators from HomeAdvisor help budget for material quantities on larger projects.
Avoid bargain-bin roofing cement. Quality products like trowel-grade sealants remain flexible through freeze-thaw cycles: cheap stuff cracks within a season.
Step-by-Step Guide to Repairing Common Roof Problems
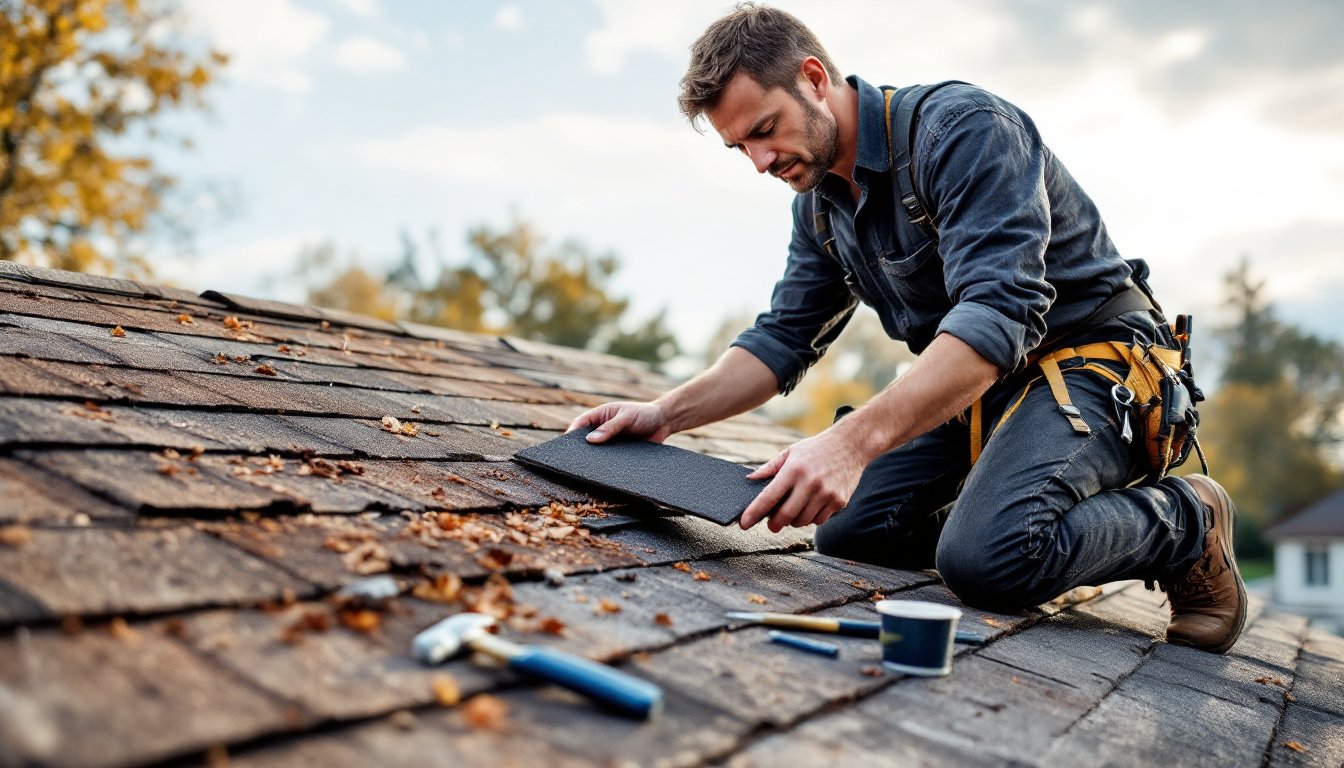
Fixing Broken or Missing Shingles
Timing matters: repair on a day between 50°F and 85°F. Shingles become brittle in cold and too pliable in heat, making proper sealing difficult.
-
Lift the damaged shingle and the one above it. Slide a flat pry bar under the tabs and gently break the adhesive seal. Each standard three-tab shingle has four nails: one near each edge and two in the center.
-
Remove the nails from the damaged shingle. Use the pry bar to lift nail heads, then pull with a claw hammer. If nails won’t budge, cut the shingle away with a utility knife and drive the old nails flush.
-
Slide the new shingle into place. Align it with adjacent shingles, gaps shouldn’t exceed ⅛ inch. For architectural shingles, match the offset pattern.
-
Secure with roofing nails. Drive four nails just below the adhesive strip, about ¾ inch from each edge and 6 inches apart in the center. Nail heads should sit flush, not driven through the shingle surface.
-
Seal the tabs. Lift the shingle above and apply a quarter-sized dollop of roofing cement under each corner of the new shingle. Press firmly for 10 seconds. This step is crucial, nails alone won’t hold in high winds.
-
Check adjacent shingles. If lifting exposed damaged areas on surrounding shingles, add cement under loose tabs.
For more detailed techniques on replacing damaged sections, repairing asphalt roof shingles provides additional visual guidance.
Sealing Leaks and Water Damage
Locate the actual breach. Water enters at one spot but travels along the roof deck before appearing inside. Trace the wet path in the attic back to its highest point, that’s your leak.
Common leak sources and fixes:
Exposed nail heads: Dab roofing cement over each exposed fastener. This is temporary, expect to reseal every 2-3 years.
Flashing gaps: Clean the area with a wire brush and apply a continuous ¼-inch bead of lap sealant along the joint. For gaps wider than ½ inch, insert foam backer rod first, then seal over it.
Valley damage: Valleys channel heavy water flow and fail first. If underlayment is intact, clean debris and apply roofing cement along the seam. Compromised underlayment requires cutting back shingles, installing ice and water shield, and replacing shingles, this enters professional territory for most DIYers.
Vent boot deterioration: Rubber boots around plumbing vents crack after 15-20 years. Pry up surrounding shingles, remove old nails, slide out the failed boot, and install a new one. Seal the base with roofing cement and re-nail shingles.
Temporary emergency patches: For active leaks during storms, apply a tarp weighted with 2×4 boards (never just sandbags, they puncture shingles). Extend the tarp at least 4 feet beyond the damaged area on all sides and anchor the uphill edge under shingles if possible.
After sealing, monitor the repair through at least two rain events. Interior staining may take weeks to dry, but new moisture indicates the fix didn’t hold.
Preventing Future Roof Damage: Maintenance Tips
Most roof damage is preventable. A twice-yearly inspection routine extends roof life by 5-10 years.
Spring inspection (post-winter):
- Clear all debris from valleys and behind chimneys where ice dams form
- Check flashing for winter frost heave damage
- Inspect attic ventilation, poor airflow accelerates shingle aging
- Trim tree branches within 6 feet of the roofline (rubbing limbs wear through shingles and drop corrosive sap)
Fall inspection (pre-winter):
- Clean gutters and downspouts to prevent ice dam formation
- Look for loose or lifted shingles that won’t survive winter winds
- Verify attic insulation meets code minimums (R-38 to R-60 depending on climate zone), heat escaping through the roof melts snow unevenly and causes ice dams
- Check caulking around roof penetrations (vents, chimneys, skylights)
Ongoing maintenance:
- Never power-wash shingles, it strips protective granules
- Address attic mold or moisture immediately: it signals ventilation problems that also damage roof decking
- Document the installation date and shingle manufacturer warranty terms (most residential shingles carry 20-30 year warranties, but pro-rated coverage drops after the first decade)
- Schedule professional inspections after severe weather events, even if no visible damage appears
For comprehensive roof repair and maintenance strategies, establishing a seasonal checklist prevents small issues from becoming catastrophic failures. A well-maintained asphalt shingle roof reaches its full service life: a neglected one fails years early, often taking structural components with it.